How many potential customers does your business quietly lose to an awkward phone system before they ever reach a human? For years, changing how calls were routed meant filing a support ticket and waiting, with no visibility, no control, and no quick way to fix a broken menu. Callers who hit a dead end rarely try twice. They just dial a competitor.
Smartflows removes that bottleneck. Admins build routing paths on a visual canvas, connecting widgets that decide what happens at each stage of a call. Set it up well, and you cut missed calls, shorten handle time, lift first-call resolution, and give callers the experience of reaching a company that has its act together. That impression sticks longer than most teams expect.
What Are Aircall Smartflows?
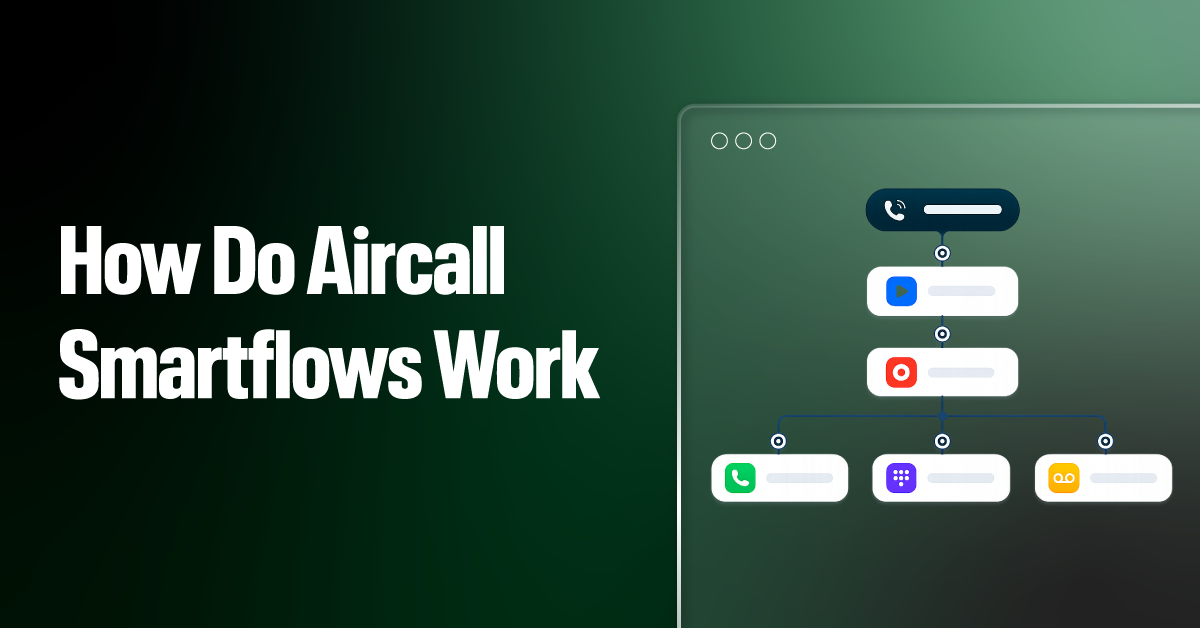
Aircall Smartflows is a visual call-routing system that lets businesses build inbound call flows using drag-and-drop widgets. Teams use it to route callers based on business hours, IVR menu selections, agent availability, and fallback paths such as voicemail, all from a single editable canvas rather than static settings or support requests.
How Does Aircall Smartflows Work?
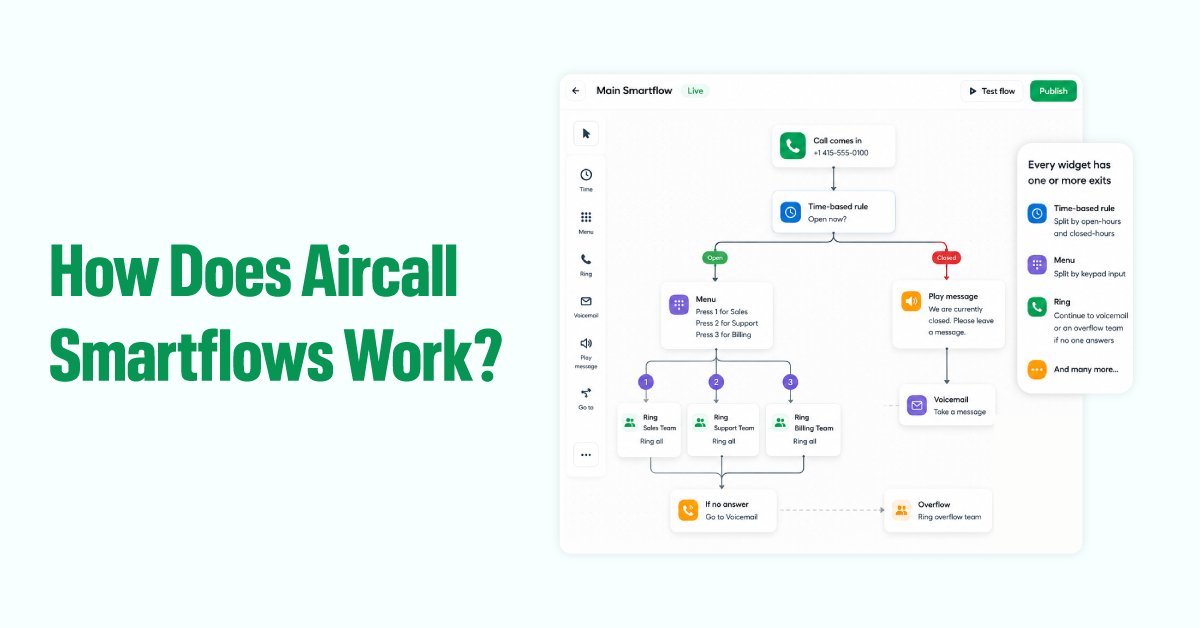

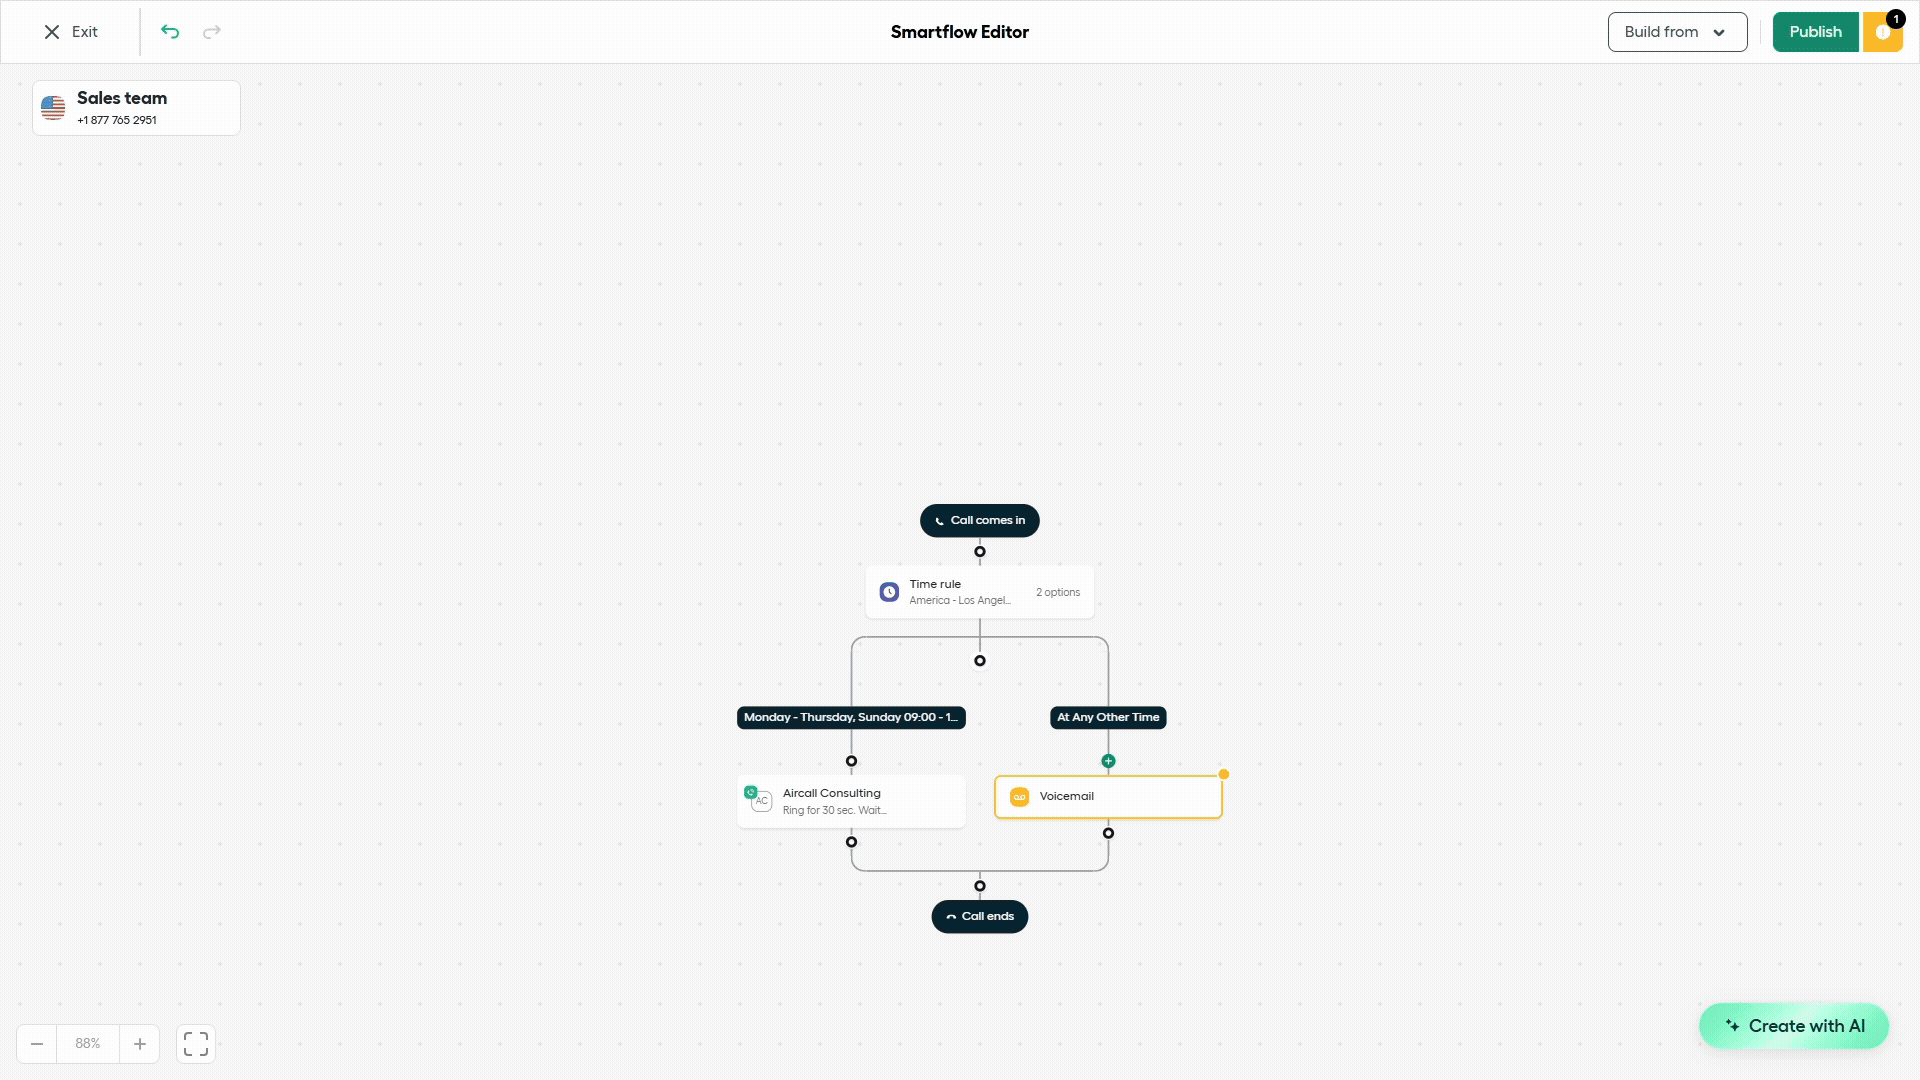
Smartflows are built in a visual canvas editor inside the Aircall dashboard. Open the Aircall Smartflow interface for a given phone number, and you’ll see the call flow builder, where you map the journey a caller takes from the moment they dial in.
The interface matters because it shows the whole caller experience at once. You can immediately spot the gaps in what happens when someone presses nothing in the menu or when the entire team is on other calls. Instead of being buried in configuration screens, your logic sits on a board you can change in seconds.
Each flow consists of individual widgets that serve as decision points or actions along the caller’s path. You connect them in sequence, and that chain becomes your live routing logic. Every widget has one or more exits:
- A time-based rule splits calls into open-hours and closed-hours branches.
- A menu splits them by keypad input.
- A ring step continues to voicemail or an overflow team if no one answers.
And many more.
6 Aircall Smartflows Widgets You Need to Know
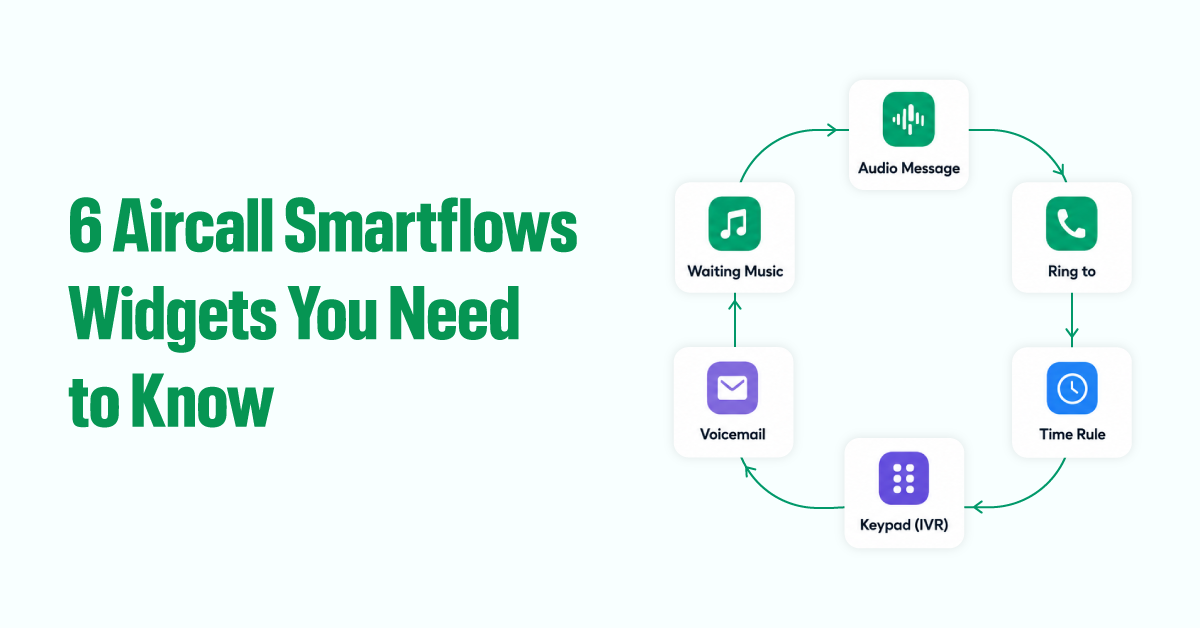
1. Audio Message
A widget that plays a pre-recorded or text-to-speech clip to the caller at any point in the flow.
It sets the tone before any human picks up. A clear, warm greeting tells the caller they’ve reached the right place and what to expect next, a small act of communication that quietly reduces hang-ups.
Common uses include a welcome greeting at the start of every call, a pre-queue note about wait times, an after-hours message explaining when the team returns, or an informational bridge between a menu selection and the ring queue.
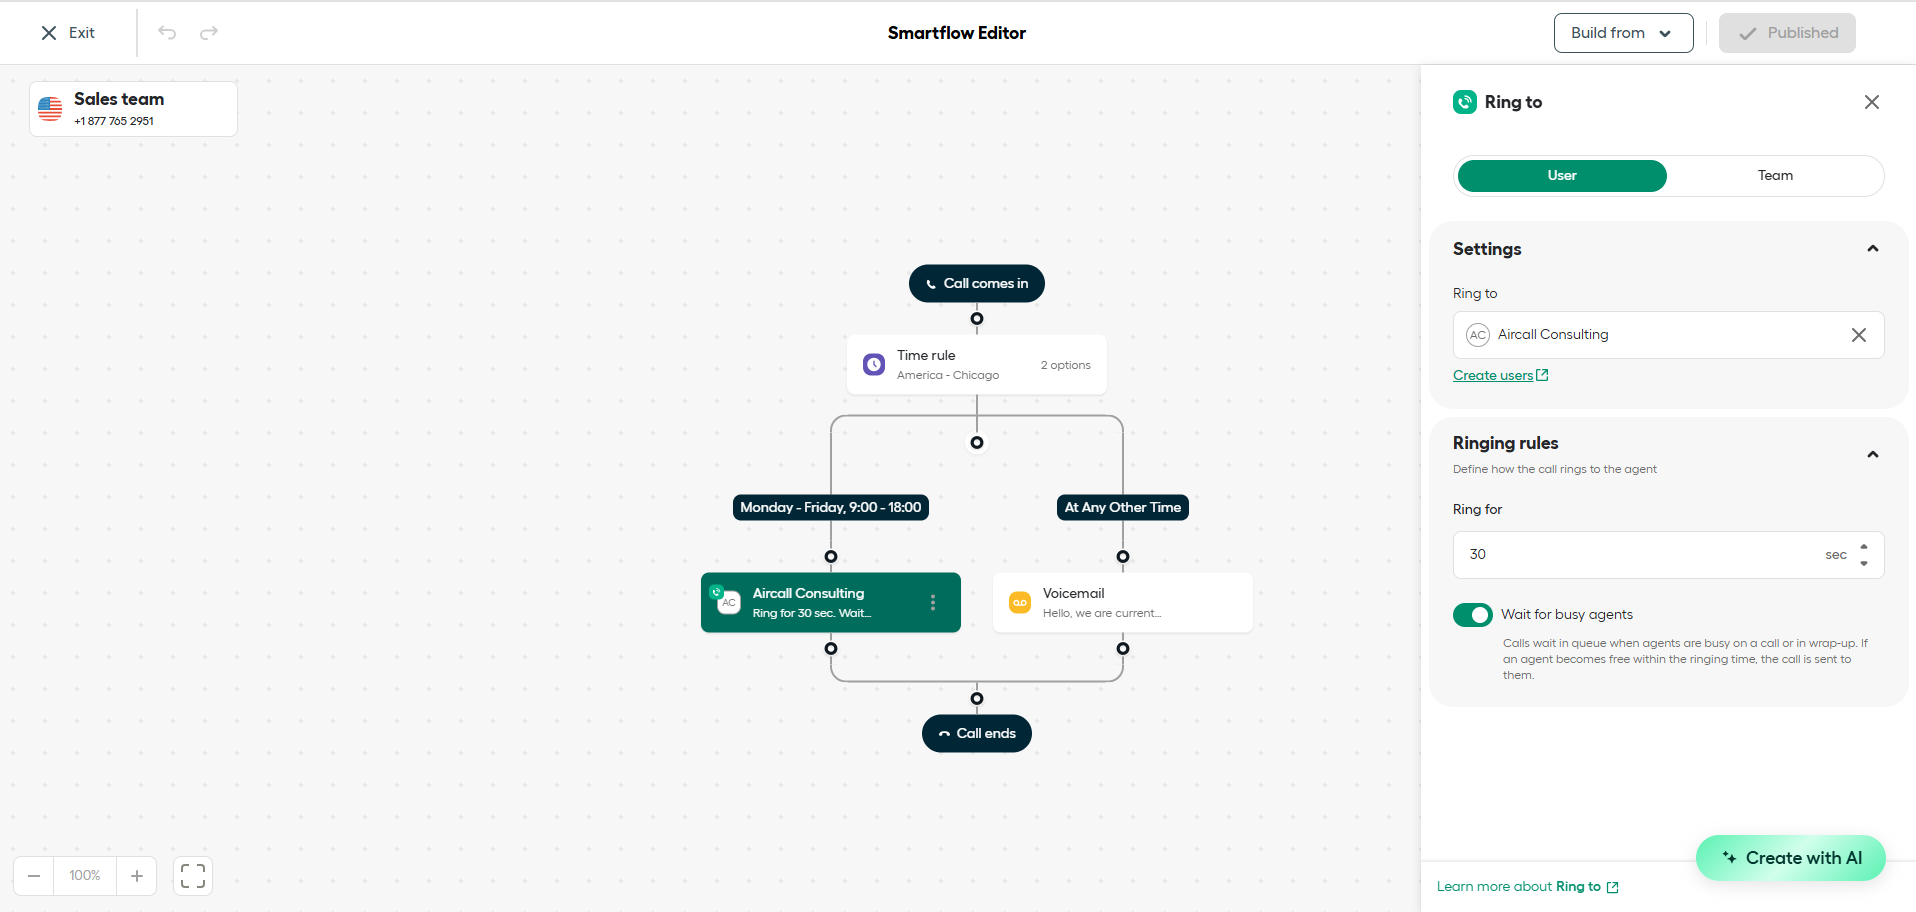
2. Ring to
A widget that connects the call to a specific agent or team, with configurable ring behavior and a timeout before the flow moves on.
This is where calls actually reach people. You can ring all agents at once or rotate through them, which shapes both your answer rate and how fairly the workload spreads across the team. The timeout controls how long the system waits before moving to a fallback, so no call ever hangs unanswered.
Teams use it to send sales calls to the sales group with simultaneous ringing, route support calls to the agent who owns the account, trigger voicemail when nobody picks up, or chain two ring steps so a call tries the primary team first and overflows to a backup.
3. Time Rule
A conditional widget that checks the time and day a call arrives, then sends it down different branches depending on whether you’re open or closed.
Without Aircall time-based routing, your flow behaves the same at 3 p.m. on a Wednesday as it does at 11 p.m. on a Sunday. Time-based branches let you build separate experiences for business hours, after hours, weekends, and holidays, so callers get a real response instead of an endless ring.
Use Aircall business hours routing to route calls to live agents during open hours and to voicemail after close, play a holiday closure message on specific dates, create a lunch-break branch that offers a callback, or manage time zone differences for teams covering multiple regions.
4. Keypad (IVR)
An interactive menu that prompts callers to press a key, then routes them to the matching branch based on their choice.
Think of Aircall IVR setup as a self-sorting system. Rather than dumping every caller into one queue and shuffling them around manually, the menu lets people identify their own need and land with the right team. Done well, it cuts transfers, shortens handle time, and removes the friction of an agent asking “what can I help you with?” before they even know if they’re the right person.
It works for offering language selection, separating new inquiries from existing-account questions, or providing a self-service option that answers common questions without an agent.
5. Voicemail
A widget that plays a custom greeting and records the caller’s message when no agent is available.
Voicemail is the fallback that turns a missed call into a captured lead. Instead of the caller hanging up and moving on, their message lands in the right inbox and gives the team something concrete to act on.
A typical Aircall voicemail setup includes an after-hours box with a branded greeting, a backup box triggered when a business-hours call goes unanswered, separate boxes that route messages to the right people, and voicemail-to-email delivery so agents receive both the audio and a transcription.
6. Waiting Music
The Waiting Music widget handles Aircall call queue management by playing waiting queue music or a branded recording while a caller waits in the queue.
Silence on hold is indistinguishable from a dropped call. Callers who hear nothing assume the line is dead and leave. Hold audio keeps them engaged and signals the connection is alive. It also doubles as a chance to reinforce your brand or share useful information while they wait.
Use call queue management in any queue where callers may wait more than a few seconds, with a custom track to maintain a consistent brand feel, or with a spoken message that directs people to self-service options or website resources. Place it before any ring step where simultaneous ringing isn’t available, and a wait is expected.
How to Build Your First Smartflow in 5 Steps
Step 1: Open the editor
Go to Dashboard → Numbers, select your number, click the Call Distribution tab, then hit Build your call flow to open the visual editor.
If you are new to Aircall, set up your numbers by clicking Dashboard → Numbers → Create a new number → Fill the required details like Country, location, and number type → Next → Put your name and ensure the location, then finally click Create Number.

Step 2: Choose your starting path
Click the (+) icon to add your first widget. Start with a Time Rule if you have different open and closed hours. Start with an Audio Message if every caller should hear the same greeting regardless of when they call.

Step 3: Drop in your core widgets
Build out the main branches. A typical inbound structure looks like this:
Time Rule → Audio Message → Keypad (IVR) → Ring to → Voicemail
Click the + on any connecting line to insert a widget there. Click any widget to open its settings panel on the right.
Step 4: Configure your routing logic
Work through each panel:
- Time Rule: Set business hours and timezone. Add holiday overrides where needed.
- Audio Message: Upload or record your greeting. Keep it under 20 seconds.
- Keypad (IVR): Map each key press to the correct branch.
- Ring to: Assign the right team. Set a timeout (20–30 seconds suits most teams) and define what happens if nobody answers.
- Voicemail: Record a greeting and set where recordings are delivered.
Every branch needs a defined endpoint. Any path without a fallback is a call that disappears.
Step 5: Test, then publish
Call your own number and walk through each branch. Confirm that every menu path routes correctly, that audio plays as expected, and that voicemail triggers when it should. An exclamation mark appears next to Publish if something is misconfigured. When it’s clean, hit the green Publish button, and your flow goes live immediately.
Common Aircall Smartflow Mistakes
Most broken flows fail in predictable ways. The biggest culprit is the dead-end branch: a path that just stops, leaving the caller in silence with nowhere to go. Close behind is a missing after-hours route, where calls ring an empty office at midnight because no Time Rule ever splits open from closed.
Overstuffed menus are another trap. When a caller has to listen to seven options, most forget the first three by the time they finish. Keep menus to three or four choices. Teams also forget that overflowing a single Ring with no backup means one busy group sends everyone to voicemail. A flow that looks right on the canvas can still route a real caller into a loop you never noticed.
Smartflow Troubleshooting
- Aircall doesn’t ring during a test. Check that the Ring to widget has agents assigned and that those agents are available, not on Do Not Disturb. Confirm the Time Rule branch you’re testing actually matches the current time.
- An IVR option does nothing. The key press likely isn’t mapped to a branch, or the branch leads nowhere. Open the Keypad settings and confirm each digit points to a real next step.
- Calls go straight to voicemail. Usually, a timeout is set too short, or a Ring to has no available agents. Lengthen the timeout to 20–30 seconds and verify someone is actually online to take the call.
- The Publish button shows an error. An exclamation mark indicates that a widget is misconfigured or that a branch has no endpoint. Follow the indicator to the flagged widget and give every path a defined exit.
Real-World Smartflow Examples
A simple sales flow might run: Business hours → Greeting → Press 1 for Sales → Sales queue (simultaneous ring) → Voicemail backup. Calls land fast during the day and never vanish after close.
A support flow adds overflow: Business hours → Greeting → Press 2 for Support → Support queue → Overflow to backup team → Voicemail. If the primary team is buried, the call quietly rolls to a second group before voicemail ever becomes the answer.
The pattern in both: a clear greeting, an availability check, a short menu, the right team, and a dependable fallback. Start there, then adjust based on the call patterns you actually see.
Final Thoughts
Once you understand what each widget does, building an effective flow comes down to sequencing and connecting the right steps in the right order so callers know where to go, and your team knows what to expect. The goal isn’t to use every option available. It’s to mirror how your business already handles calls.
For most teams, a strong flow opens with a clear greeting, checks availability with a Time Rule, sends callers through a short menu when needed, routes them to the right team, and leans on voicemail as a reliable backstop. From there, you refine based on real call data and how your team changes over time. Keep the structure simple, test every path, and update it as your process evolves.